If your embedded system makes use of the OpenBLT bootloader, then essentially you have two software programs present in flash memory: your own firmware and the OpenBLT bootloader. This added complexity can cause a problem when trying to debug your firmware. This article describes the cause of this problem and explains how it is side-stepped, giving you full firmware debug functionality.
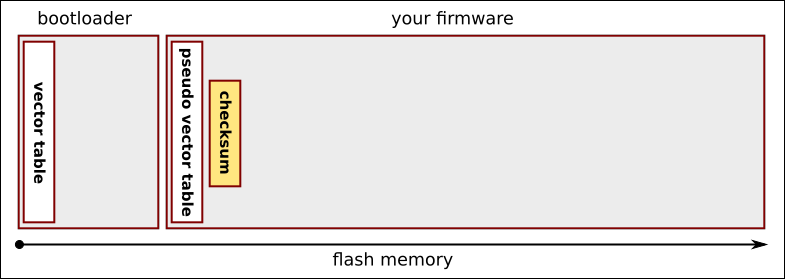
After a microcontroller reset, the bootloader’s reset handler executes, which starts the bootloader. The bootloader verfies the checksum in your firmware to determine if firmware is present and if it can be started. This checksum value is written by the bootloader during a firmware update. Right before starting your firmware, the bootloader remaps the vector table to make sure that your firmware’s vector table gets used, after it starts your firmware.
The reasons that firmware debugging doesn’t work as expected, on a system that also has the OpenBLT bootloader present, is because: (1) your debugger doesn’t remap the vector table, and (2) your debugger doesn’t write the checksum value. Resolving these two issues, enables you to debug your firmware as expected. The remainder of this article explains how to resolve these two issues, using the ST Nucleo-F091RC bootloader demo programs as an example.
Remap the vector table
Remapping of the vector table is microcontroller specific. For some microcontrollers, such as the STM32F4, all that has to be done is reconfiguring the base address of the vector table. For other microcontrollers, such as the STM32F0, the vector table needs to be copied to RAM. To find out how the bootloader handles the vector table remapping for your microcontroller, have a look at function CpuStartUserProgram() in the port specific source file cpu.c. Here is the example for the STM32F0:

To resolve the problem of your debugger not remapping the vector table, simply copy the related functionality from the bootloader’s CpuStartUserProgram() function to your firmware, ideally at the start of function main(). For the Nucleo-F091RC demo user program, edit source file main.c and add the following code at the start of function main():
/* enable system configuration peripheral, which is needed to remap
 * the RAM later on
 */
__HAL_RCC_SYSCFG_CLK_ENABLE();

/* copy user program vectors to RAM */
memcpy((void *)0x20000000ul, (void *)0x08002000ul, 0xC0);

/* remap RAM so that it also appears at address 0x00000000. this way
 * the user program's vector table in RAM is used instead of the
 * bootloader's vector table in flash.
 */
__HAL_SYSCFG_REMAPMEMORY_SRAM();
Next, include header file string.h to make sure the compiler knows the function prototype of memcpy():
#include <string.h>
Bypass the checksum verification
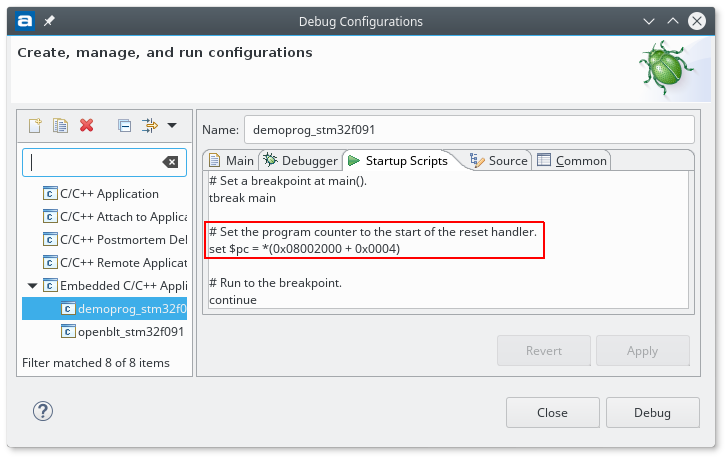
An easy method of resolving the problem that your debugger doesn’t write your firmware’s checksum value, is to bypass the bootloader’s checksum verification altogether. All debuggers allow you to change the program counter CPU register value. If you set the program counter to the address of your firmware’s reset handler function, the debugger completely bypasses execution of the bootloader, including the checksum verification. Instead, it starts your firmware program directly.
If you chose the IAR Embedded Workbench as your development tool, then you are in luck. IAR’s C-SPY debugger automatically sets the program counter to the reset handler address of the loaded firmware, so no further steps are needed. If you use a GDB based debugger, such as the one included with Atollic’s TrueStudio, you can add a command to the debugger’s startup script to change the program counter register: set $pc = <address>.
Here follows the example for the Nucleo-F091RM demo user program. This demo firmware is linked to start at memory address 0x08002000 in flash. This is where the demo firmware’s pseudo vector table is present. The 2nd entry (at offset 0x0004) into this vector table, holds the address of the reset handler function:
If you start the debug session after making these two changes, everything will work as expected. You can debug your firmware just like you did when no bootloader was present. Just keep in mind that the checksum value was not written when the debugger flashed your firmware. This means that if you reset your microcontroller after finishing your debug session, the bootloader won’t actually start your firmware. This can easily be solved by performing a firmware update with the OpenBLT bootloader.
The method presented in this article should work for all microcontroller supported by the OpenBLT bootloader. If you are struggling with getting it to work, feel free to contact us for hints and tips. Did you figure out an even better method? Feel free to share it with us in the comment section.