Table of Contents
BootCommander Utility
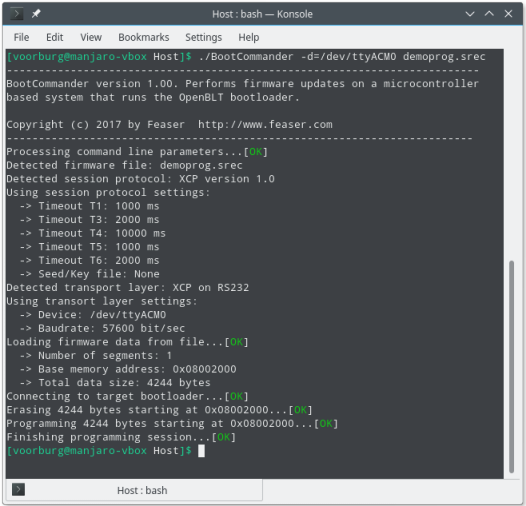
BootCommander is a command line interface (CLI) program for performing firmware updates on a microcontroller that runs the OpenBLT bootloader. It provides a firmware update tool for those that prefer a command line interface program over one with a graphical user interface, such as MicroBoot.
BootCommander was written in the C programming language (C99) and developed with cross-platform support in mind. It has been successfully tested on a Windows PC, Linux PC and even on embedded Linux systems such as a Raspberry Pi and a Beagle Board.
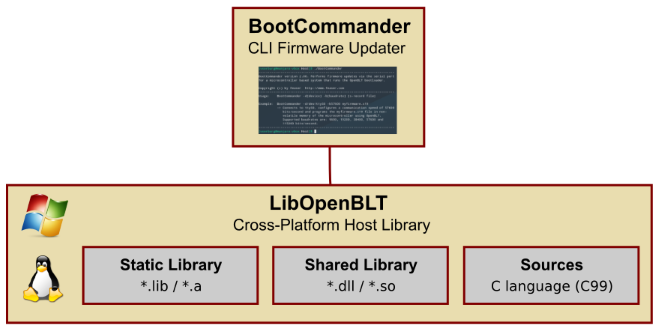
Under the hood, BootCommander relies on the OpenBLT host library (LibOpenBLT) for handling the actual communication with the bootloader.
Thanks to the open source nature of the OpenBLT project, full source code is available for the BootCommander program. This makes it a great reference and starting point for those that would like to develop their own firmware update tool. For details on its implementation, refer to the reference manual that is located at: .\Doc\RM_BootCommander.pdf.
Program usage
When calling the BootCommander program from the terminal, it expects a few options followed by a firmware file: BootCommander [options] [firmware file].
The currently supported firmware file format is S-records and the location of the firmware file can be specified as either an absolute or relative path. The options the make it possible to select and configure the communication protocol and transport layer to use:
- -s=[name] specifies the name of the communication protocol. Supported names are:
- xcp (default) = XCP version 1.0
- -t=[name] specifies the name of the transport layer. Supported names are:
- xcp_rs232 (default) = XCP on RS232.
- xcp_can = XCP on CAN.
- xcp_usb = XCP on USB.
- xcp_net = XCP on TCP/IP.
Additional XCP version 1.0 communication protocol settings (xcp):
- -t1=[timeout] sets the command response timeout in milliseconds as a 16-bit value (default = 1000 ms).
- -t3=[timeout] sets the start programming timeout in milliseconds as a 16-bit value (default = 2000 ms).
- -t4=[timeout] sets the erase memory timeout in milliseconds as a 16-bit value (default = 10000 ms).
- -t5=[timeout] sets the program memory and target reset timeout in milliseconds as a 16-bit value (default = 1000 ms).
- -t7=[timeout] sets the busy wait timer timeout in milliseconds as a 16-bit value (default = 2000 ms).
- -sk=[file] sets the seek/key algorithm library filename (optional).
- -cm=[value] sets the connection mode value sent in the XCP connect command, as a 8-bit value (default = 0).
Additional XCP on RS232 settings (xcp_rs232):
- -d=[name] sets the name of the communication device. For example COM1 or /dev/ttyUSB0 (mandatory).
- -b=[value] sets the communication speed in bits per second, as a 32-bit value (default = 57600). Supported values are: 9600, 19200, 38400, 57600, 115200.
Additional XCP on Modbus RTU settings (xcp_mbrtu):
- -d=[name] sets the name of the communication device. For example COM1 or /dev/ttyUSB0 (mandatory).
- -b=[value] sets the communication speed in bits per second, as a 32-bit value (default = 57600). Supported values are: 9600, 19200, 38400, 57600, 115200.
- -pa=[value] sets the UART parity bit configuration as a 8-bit value (default = 2). Supported values are: 0 (none), 1 (odd), 2 (even).
- -sb=[value] sets the UART stopbits configuration as a 8-bit value (default = 1). Supported values are: 1, 2.
- -da=[value] sets the destination address, i.e. the node ID of the receiver as a 8-bit value (default = 1). Supported values are: between 1 and 247.
Additional XCP on CAN settings (xcp_can):
- -d=[name] sets the name of the CAN device (mandatory). On Linux this is the name of the SocketCAN network interface, such as can0, slcan0. On Windows it specifies the CAN adapter. Currently supported CAN adapters:
- peak_pcanusb = Peak System PCAN-USB.
- kvaser_leaflight = Kvaser Leaf Light V2.
- lawicel_canusb = Lawicel CANUSB.
- vector_xldriver = Vector XL Driver.
- ixxat_vcidriver = Ixxat VCI Driver.
- -c=[value] sets the zero based index of the CAN channel if multiple CAN channels are supported for the CAN adapter, as a 32-bit value (default = 0).
- -b=[value] sets the communication speed, a.k.a baudrate in bits per second, as a 32-bit value (default = 500000). Supported values: 1000000, 800000, 500000, 250000, 125000, 100000, 50000, 20000, 10000.
- -tid=[value] sets the CAN identifier for transmitting XCP command messages from the host to the target, as a 32-bit hexadecimal value (default = 667).
- -rid=[value] sets the CAN identifier for receiving XCP response messages from the target to the host, as a 32-bit hexadecimal value (default = 7E1).
- -xid=[value] configures the 'tid' and 'rid' CAN identifier values as 29-bit CAN identifiers, if this 8-bit value is > 0 (default = 0).
Additional XCP on TCP/IP settings (xcp_net):
- -a=[value] sets the IP-address or hostname of the target to connect to. For example 192.168.178.23 (mandatory).
- -p=[value] sets the TCP port number to use, as a 16-bit value (default = 1000).
Program settings:
- -sm Silent mode configuration switch. When specified, only minimal information is written to the output (optional).
Note that is it not necessary to specify an option if its default value is already the desired value. This means that the following two examples behave exactly the same:
BootCommander -d=COM4 demoprog.srec
and
BootCommander -s=xcp -t=xcp_rs232 -d=COM4 -b=57600 -t1=1000 -t3=2000 -t4=10000 -t5=1000 -t7=2000 demoprog.srec
Building BootCommander from sources
BootCommander relies on CMake to automatically detect the build tools on your system and to generate the build environment for it. The following instructions assume that CMake is installed on your system and is available on the path. Windows users can download the installer from http://www.cmake.org/. Mainstream Linux distributions have CMake in their software repository and it can be installed from there. Example for Ubuntu based distributions:
sudo apt-get install cmake
Note that BootCommander relies on the OpenBLT Host Library (LibOpenBLT) and some of the files that were generated when building LibOpenBLT. Therefore, make sure you already built LibOpenBLT, before you attempt to build BootCommander.
Building on Linux with GCC
This method assumes that the basic tools needed for building software are installed. At least the GCC compiler and Make are needed. On Ubuntu based distributions, these tools can be installed via command:
sudo apt-get install build-essential
Using the terminal, set the working directory to ./Host/Source/BootCommander/build. Next, type the following two commands to detect and generate the Unix Makefiles based build environment and then build the BootCommander executable:
cmake ..
make

After a successful build, the BootCommander executable is located in the ./Host directory.
Building on Windows with Microsoft Visual C++
This method assumes that Microsoft Visual C++ is installed. During the BootCommander development, Microsoft Visual Studio 2019 was used. The method outlined here should work just fine with both older and newer versions of Microsoft Visual Studio.
Using the Command Prompt in Windows, set the working directory to .\Host\Source\BootCommander\build and type the command:
cmake ..
A solution file for Microsoft Visual C++ is then automatically generated, called BootCommander.sln. Open the solution in Microsoft Visual C++ and build the program from there, by selecting Build→Rebuild Solution from the menu.
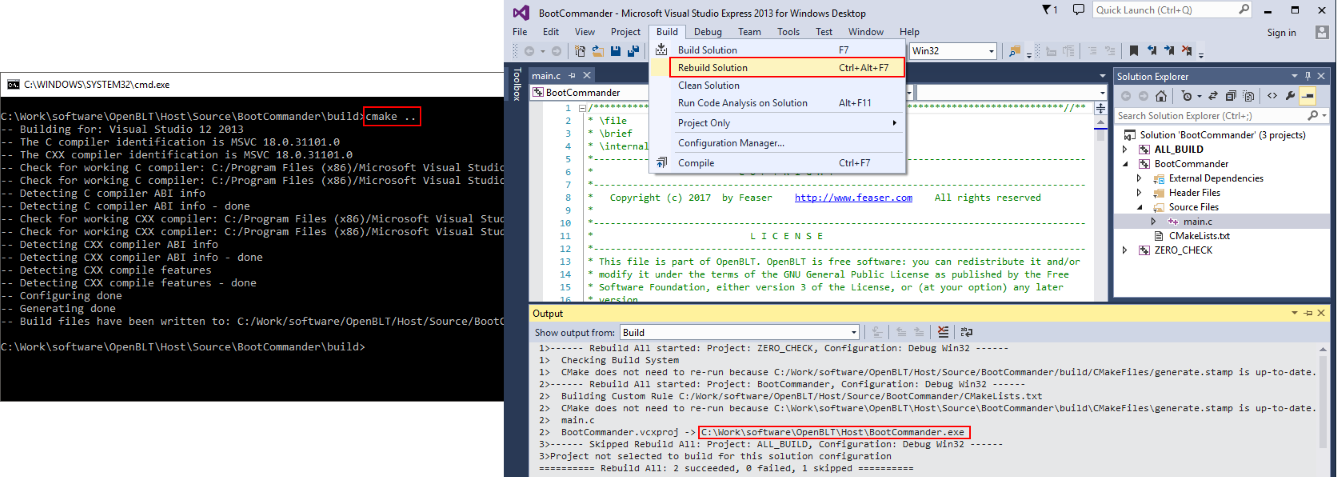
After a successful build, the BootCommander.exe executable is located in the ./Host directory.
Note that this builds a 64-bit version of BootCommander.exe, which then also requires a 64-bit version of the LibOpenBLT shared library (libopenblt.dll). Starting with OpenBLT version 1.14, LibOpenBLT is built and distributed as a 64-bit library, so that works well together.
If you use the 32-bit LibOpenBLT shared library from before OpenBLT version 1.14, or if you rebuilt it yourself as 32-bit, then you should build BootCommander as 32-bit as well. To build a 32-bit version of BootCommander, generate the build environment with command “cmake -A Win32..”.
Building on Windows with MinGW
This method assumes that the MinGW compiler toolchain is installed on your PC. A convenient way to install it, is by downloading the installer that bundles the Code::Blocks IDE together with MinGW. When using OpenBLT version 1.14 or newer, it is recommended to download the 64-bit installer version, because the included libopenblt.dll file is 64-bit as well. Otherwise you can download the 32-bit installer version.
Make sure the .\bin directory of the MinGW installation directory is added to your path in Windows. A quick way to verify that this is the case, run the following command from the Command Prompt in Windows and make sure the program could be found:
mingw32-make
Using the Command Prompt in Windows, set the working directory to .\Host\Source\BootCommander\build. Next, type the following two commands to detect and generate the MinGW Makefiles based build environment and then build the BootCommander executable:
cmake -G "CodeBlocks - MinGW Makefiles" ..
mingw32-make
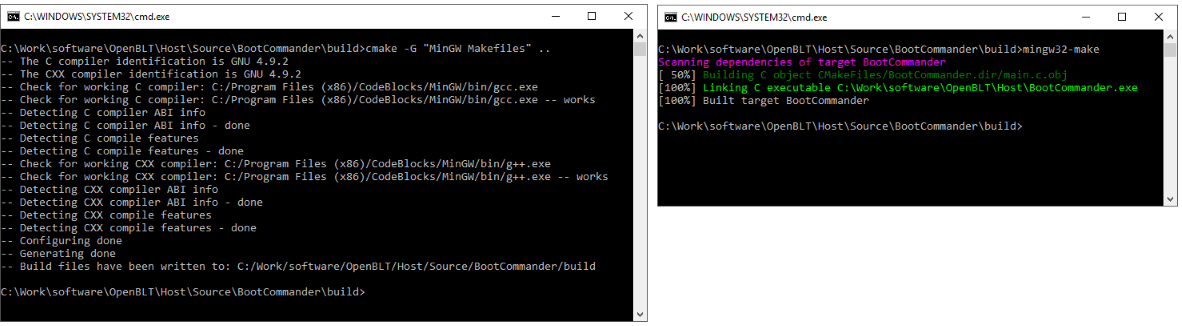
After a successful build, the BootCommander.exe executable is located in the .\Host directory.