All ports available in the OpenBLT bootloader support reprogramming the microcontroller’s internal flash memory. But what if your system features an additional memory device, such as an external flash memory or serial EEPROM? The OpenBLT bootloader can work with these types of additional memory devices as well. In essence, you simply change one configuration macro in the bootloader’s configuration header-file:
Although practically, enabling the additional memory device involves a few more steps. One of which being the binding of your memory device’s driver with the OpenBLT bootloader. This article explains in depth how to add support for an additional memory device in the OpenBLT bootloader.
Use case for supporting additional memory devices
Over the past years I worked closely with a significant amount of customers, to assist with building a custom-fit bootloader for their microcontroller based systems. I noticed that they often include an external memory device on their PCB and interface it with their microcontroller. Usually a small SPI or I2C EEPROM of a few kilobytes for storing application configuration data and calibration parameters. Sometimes even much larger flash memory chips of several megabytes, for storing actual firmware data, made possible by the eXecute In Place (XIP) features of Quad and Octo SPI peripherals.
In both cases, the developers require a feature in the OpenBLT bootloader to add support for being able to reprogram these additional memory devices, during the firmware update. Especially in the latter case, where the firmware runs partially or entirely from the external flash. Most debuggers do not directly include support for some of these memory chips, making firmware programming and debugging challenging. Completely solved if the OpenBLT bootloader can reprogram the memory chip during the firmware update. To debug your firmware, you then first perform a firmware update using the OpenBLT bootloader to get the firmware data in flash. Next, you configure your debugger session to skip the flashing part and only load the debug symbols.
Enabling support for additional memory devices
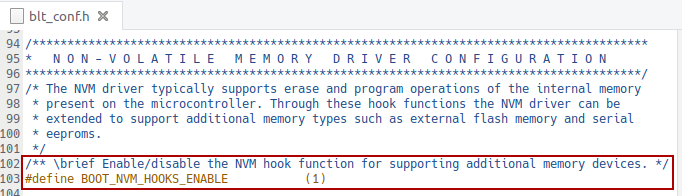
As a first step in making your external memory device work with the OpenBLT bootloader, enable support for additional memory devices in the bootloader:
- Set configuration macro
BOOT_NVM_HOOKS_ENABLEto a value of1in your “blt_conf.h” configuration header-file.
This enables the following hook-functions that the bootloader will now call each time it is about to perform some sort of memory operation:
void      NvmInitHook(void);
blt_int8u NvmWriteHook(blt_addr addr, blt_int32u len, blt_int8u *data);
blt_int8u NvmEraseHook(blt_addr addr, blt_int32u len);
blt_bool  NvmDoneHook(void);
You can find an empty placeholder implementation of these in the “hooks.c” source-file of the bootloader application. If not present, you can add them yourself:
/***************************************************************************//**
** \brief     Callback that gets called at the start of the internal NVM driver
**            initialization routine.
** \return    none.
**
*******************************************************************************/
void NvmInitHook(void)
{
} /*** end of NvmInitHook ***/


/***************************************************************************//**
** \brief     Callback that gets called at the start of the NVM driver write
**            routine. It allows additional memory to be operated on. If the
**            address is not within the range of the additional memory, then
**            BLT_NVM_NOT_IN_RANGE must be returned to indicate that the data
**            hasn't been written yet.
** \param     addr Start address.
** \param     len  Length in bytes.
** \param     data Pointer to the data buffer.
** \return    BLT_NVM_OKAY if successful, BLT_NVM_NOT_IN_RANGE if the address is
**            not within the supported memory range, or BLT_NVM_ERROR is the
**            write operation failed.
*******************************************************************************/
blt_int8u NvmWriteHook(blt_addr addr, blt_int32u len, blt_int8u *data)
{
  return BLT_NVM_NOT_IN_RANGE;
} /*** end of NvmWriteHook ***/


/***************************************************************************//**
** \brief     Callback that gets called at the start of the NVM driver erase
**            routine. It allows additional memory to be operated on. If the
**            address is not within the range of the additional memory, then
**            BLT_NVM_NOT_IN_RANGE must be returned to indicate that the memory
**            hasn't been erased yet.
** \param     addr Start address.
** \param     len  Length in bytes.
** \return    BLT_NVM_OKAY if successful, BLT_NVM_NOT_IN_RANGE if the address is
**            not within the supported memory range, or BLT_NVM_ERROR is the
**            eraseoperation failed.
**
*******************************************************************************/
blt_int8u NvmEraseHook(blt_addr addr, blt_int32u len)
{
  return BLT_NVM_NOT_IN_RANGE;
} /*** end of NvmEraseHook ***/


/***************************************************************************//**
** \brief     Callback that gets called at the end of the NVM programming
**            session.
** \return    BLT_TRUE is successful, BLT_FALSE otherwise.
**
*******************************************************************************/
blt_bool NvmDoneHook(void)
{
  return BLT_TRUE;
} /*** end of NvmDoneHook ***/
At this point rebuild the bootloader, just to make sure that no compiler or linker errors occur. If you do get compiler or linker errors at this point, fix them before continuing.
Developing your memory device driver
With the additional memory device support enabled in the OpenBLT bootloader, we now need an actual memory driver. Basically the code responsible for the actual erasing and programming of the memory device. This part is up to you to implement. However, I’ll present you with a template that you can use as a starting point. It consists of two files:
memdrv.h– Your memory driver’s header file:
#ifndef MEMDRV_H
#define MEMDRV_H

/*******************************************************************************
* Function prototypes
*******************************************************************************/
void       MemDrvInit(void);
blt_bool   MemDrvWrite(blt_addr address, blt_int32u len, blt_int8u const * data);
blt_bool   MemDrvErase(blt_addr address, blt_int32u len);
blt_bool   MemDrvDone(void);
blt_int32u MemDrvGetSize(void);
blt_addr   MemDrvGetBaseAddress(void);

#endif /* MEMDRV_H */
memdrv.c– Your memory driver’s source file:
/*******************************************************************************
* Include files
*******************************************************************************/
#include "boot.h"                       /* bootloader generic header          */
#include "memdrv.h"                     /* memory device driver header        */


/* This source file implements the driver framework for an additional memory
 * device. It is interfaced to the bootloader's non-volatile memory (NVM)
 * module, through the NvmXxxHook() functions located in "hooks.c". The
 * configuration macro BOOT_NVM_HOOKS_ENABLE was set to 1 to activate these
 * hook-functions.
 *
 * In a nutshell, you just need to implement the low-level memory erase and
 * program functionality in this source-file:
 *
 *   - MemDrvInit()
 *   - MemDrvWrite()
 *   - MemDrvErase()
 *   - MemDrvGetSize()
 *   - MemDrvGetBaseAddress()
 *   - MemDrvDone()
 *
 * Afterwards, the bootloader can reprogram data in this additional memory
 * device, during a firmware update.
 */


/*******************************************************************************
* Macro definitions
*******************************************************************************/
/* TODO ##MemDrv Set the total size in bytes of the memory device. */
#define MEM_DRV_DEVICE_TOTAL_SIZE      (16U * 1024U)

/* TODO ##MemDrv Set the base address of the memory device in the memory map. */
#define MEM_DRV_DEVICE_BASE_ADDR       (0x08080000UL)


/***************************************************************************//**
** \brief     Initializes the memory device driver.
** \return    none.
**
*******************************************************************************/
void MemDrvInit(void)
{
  /* TODO ##MemDrv Initialize your memory device driver. For example enabling
   *      and configuring the QSPI peripheral.
   */
} /*** end of MemDrvInit ***/


/***************************************************************************//**
** \brief     Write a certain amount of bytes to the memory device, starting at
**            the specified base address.
** \param     address The base address for the write operation.
** \param     len The number of bytes to write.
** \param     data Pointer to byte array where the data is read from.
** \return    BLT_TRUE if successful, BLT_FALSE otherwise.
**
*******************************************************************************/
blt_bool MemDrvWrite(blt_addr address, blt_int32u len, blt_int8u const * data)
{
  blt_bool result = BLT_TRUE;

  /* TODO ##MemDrv Program all the data byte at the specified memory location
   *      of your memory device. Set result to BLT_FALSE upon error detection.
   */

  /* Give the result back to the caller. */
  return result;
} /*** end of MemDrvWrite ***/


/***************************************************************************//**
** \brief     Erase a certain amount of bytes from the memory device, starting
**            at the specified base address.
** \param     address The base address for the erase operation.
** \param     len The number of bytes to erase.
** \return    BLT_TRUE if successful, BLT_FALSE otherwise.
**
*******************************************************************************/
blt_bool MemDrvErase(blt_addr address, blt_int32u len)
{
  blt_bool result = BLT_TRUE;

  /* TODO ##MemDrv Erase the specified range of memory. Set result to BLT_FALSE
   *      upon error detection. If your memory device automatically erases a
   *      byte before programming a new one, there is no need to implement
   *      anything here.
   */

  /* Give the result back to the caller. */
  return result;
} /*** end of MemDrvErase ***/


/***************************************************************************//**
** \brief     Finalizes the memory device driver operations.
** \return    BLT_TRUE is succesful, BLT_FALSE otherwise.
**
*******************************************************************************/
blt_bool MemDrvDone(void)
{
  blt_bool result = BLT_TRUE;

  /* TODO ##MemDrv This function is called at the end of a firmware update. Set
   *      result to BLT_FALSE upon error detection. You can use it to finalize
   *      the memory device erase/program operations, if applicable. For example
   *      if data is first buffered in RAM blocks, before actually writing to
   *      the memory device, there might still be data pending to be written to
   *      the device at the end of the firmware update. This can be done in
   *      this function.
   */

  /* Give the result back to the caller. */
  return result;
} /*** end of MemDrvDone ***/


/***************************************************************************//**
** \brief     Getter to read the total size of the memory device.
** \return    Total size in bytes of the memory device.
**
*******************************************************************************/
blt_int32u MemDrvGetSize(void)
{
  return MEM_DRV_DEVICE_TOTAL_SIZE;
} /*** end of MemDrvGetSize ***/


/***************************************************************************//**
** \brief     Getter to read the base address of the memory device in the memory
**            map.
** \return    Base address of the memory device.
**
*******************************************************************************/
blt_addr MemDrvGetBaseAddress(void)
{
  return MEM_DRV_DEVICE_BASE_ADDR;
} /*** end of MemDrvGetBaseAddress ***/
Continue by implementing the memory driver for your device. Refer to the comments starting with TODO ##MemDrv for details on what to do. Make sure to test your memory driver before moving on to the next step.
Binding your memory driver with the bootloader
With support for the additional memory device enabled and your own memory device driver implemented and tested, we just need to glue these two parts together. We do this by updating the implementation of the previously added hook-functions in hooks.c. Start by including your memory driver’s header file in hooks.c:
#include "memdrv.h" /* memory device driver header */
Next, update the implementation of the hook-functions to represent thee following:
void NvmInitHook(void)
{
  /* Initialize the additional memory device driver. */
  MemDrvInit();
}


blt_int8u NvmWriteHook(blt_addr addr, blt_int32u len, blt_int8u *data)
{
  blt_int8u result = BLT_NVM_NOT_IN_RANGE;

  /* Is this data destined for the additional memory device? */
  if ( (addr >= MemDrvGetBaseAddress()) &&
       ((addr + len) <= (MemDrvGetBaseAddress() + MemDrvGetSize())) )
  {
    /* In range of the memory device, so update the result. */
    result = BLT_NVM_ERROR;
    /* Perform the write operation. */
    if (MemDrvWrite(addr, len, data) == BLT_TRUE)
    {
      /* Success. */
      result = BLT_NVM_OKAY;
    }
  }
  /* Give the result back to the caller. */
  return result;
}


blt_int8u NvmEraseHook(blt_addr addr, blt_int32u len)
{
  blt_int8u result = BLT_NVM_NOT_IN_RANGE;

  /* Is this data destined for the additional memory device? */
  if ( (addr >= MemDrvGetBaseAddress()) &&
       ((addr + len) <= (MemDrvGetBaseAddress() + MemDrvGetSize())) )
  {
    /* In range of the memory device, so update the result. */
    result = BLT_NVM_ERROR;
    /* Perform the erase operation. */
    if (MemDrvErase(addr, len) == BLT_TRUE)
    {
      /* Success. */
      result = BLT_NVM_OKAY;
    }
  }
  /* Give the result back to the caller. */
  return result;
}


blt_bool NvmDoneHook(void)
{
  /* Finalizes the additional memory device driver operations. */
  return MemDrvDone();
}
If you now build and program the modified OpenBLT bootloader on your microcontroller, it can reprogram the data in the additional memory device, during the firmware update.
Fully functional example
Learning new things on a microcontroller always goes easier, if you have a fully working example to reference and study. For this reason, I added support for an additional memory device to one of the existing OpenBLT demo programs:
- Nucleo-L152RE STM32CubeIDE demos documentation on the Wiki
- Nucleo-L152RE STM32CubeIDE demos code on GitHub
The STM32L152RE microcontroller on this Nucleo board contains an internal data EEPROM, in addition to the internal flash EEPROM. The STM32L1 port itself includes functionality for reprogramming the internal flash memory. The technique for adding support for an additional memory device from this article, was used to add support for the internal data EEPROM.
For testing purposes, you can generate an S-record with random data, located at a memory location of where your memory device is mapped to your microcontroller’s memory map. The srec_cat tool can be used for this. Example for generating 1kb of random data at memory address 0x08080000:
srec_cat -generator 0x08080000 0x08080400 -repeat-data 0x00 -exclude 0x08080000 0x08080400 -random-fill 0x08080000 0x08080400 -o eeprom_data.srec -Motorola
Wrap up
In this tutorial article you learned how to add support for an additional memory device in the OpenBLT bootloader. The article presented a template memory driver, which you can use to:
- Implement the low-level logic for erasing and programming your memory device.
- Easily interface it to OpenBLT’s NVM hook-functions to support it as an additional memory device.
Feel free to download this memory driver and use it as a starting point for your own development efforts.
Note that Feaser also offers engineering services for developing the memory driver for you and providing demo programs that properly interface it to the OpenBLT bootloader.