Navigation
External Links
Donate
Show your appreciation for OpenBLT
and support future development by
donating.

External Links
Donate
Show your appreciation for OpenBLT
and support future development by
donating.
The OpenBLT bootloader is an open source project, allowing everyone to access the sources. One downside of this is that if someone knows the OpenBLT bootloader is used in your product, it is relatively easy for them to figure out how to update the firmware in your product. Although this could be a feature of your product, in most cases it is not desirable.
For this reason the bootloader contains a seed/key security module. If this security module is enabled in the bootloader's configuration, updates can only be made by users that have the seed/key shared library (*.dll, *.so) with the correct security algorithm on their PC. If not, then firmware updates are not allowed and the bootloader will simply not allow a connection to be established, regardless of how many times the microcontroller is reset:

The demo bootloader programs are prepared to use the seed/key security module. All that has to be done to enable it, is to set the configuration macro BOOT_XCP_SEED_KEY_ENABLE to a value of 1 in “blt_conf.h”. Once changed the bootloader should be rebuild an programmed into the flash memory of your microcontroller.
#define BOOT_XCP_SEED_KEY_ENABLE (1)
The next step is to configure the location of the seed/key shared library in Microboot. The demo programs are preconfigured to work with the one called “libseednkey.dll”. This file is located in the same directory as Microboot. Follow these steps:

If you now perform a firmware update, everything will work as usual. The moment you remove the “libseednkey.dll”-file or if it contains an invalid security unlock algorithm, firmware updates will be rejected by the bootloader.
When using the BootCommander command-line program for making firmware updates, you can specify the filename of the Seed and Key shared library on the command-line using the -sk= option. If the shared library is in the same directory as the BootCommander program, then there is no need to specify the full path.
Example on Windows:
BootCommander -t=xcp_usb -sk=libseednkey.dll demoprog_olimex_stm32h103.srec
Example on Linux:
./BootCommander -t=xcp_usb -sk=libseednkey.so demoprog_olimex_stm32h103.srec
Once the security feature is configured and working, you will want to change the security algorithm. The way is works is that to unsecure the bootloader, the Microboot tool obtains a so-called seed from the bootloader. This seed is typically a sequence of up to 6 bytes. Microboot then passes this seed to the function XCP_ComputeKeyFromSeed() in the seed/key DLL to run your security algorithm, resulting in a so-called key. This key is typically a sequence of up to 6 bytes. Next, Microboot sends this key back to the bootloader. The bootloader runs the same security algorithm to verify the key. If okay, memory operations on memory will be allowed, otherwise rejected.
The bootloader calls two hook-functions during the security unlock procedure: one for obtaining the seed (XcpGetSeedHook()) and one for verifying the key (XcpVerifyKeyHook()). The default example implementation in the demo programs is very simply. The seed is always just one byte with the hexadecimal value of 55h. The security algorithm is such that the value of the key is the value of the seed, minus 1:
blt_int8u XcpGetSeedHook(blt_int8u resource, blt_int8u *seed)
{
  /* set the seed */
  seed[0] = 0x55;

  /* return seed length */
  return 1;
}

blt_int8u XcpVerifyKeyHook(blt_int8u resource, blt_int8u *key, blt_int8u len)
{
  /* the example key algorithm in "libopenblt.dll" works as follows:
   *  - programming resource will be unlocked if key = seed - 1
   */

  /* check key for unlocking ProGraMming resource */
  if (key[0] == (0x55-1))
  {
    /* correct key received for unlocking PGM resource */
    return 1;
  }

  /* still here so key incorrect */
  return 0;
}
To customize, change the code in these two functions and use your creativity to change the seed generation and the key verification algorithm. One good approach is to use a seed that changes, ideally using a random number generator peripheral, if your microcontroller offers one. Otherwise, you can use a software solution such as the on available in MicroTBX. Don't forget to rebuild the bootloader and program it into the flash memory of your microcontroller after making changes.
A CMake project is included in the OpenBLT download package for building the example XCP Seed and Key shared library. The CMake project is located in the \Host\Source\SeedNKey\ directory.
To customize the security algorithm, open the source-file “seednkey.c” for editing. The security algorithm is implemented in the XCP_ComputeKeyFromSeed() function. The example implementation matches the security algorithm from the bootloader, where the key is computed by subtracting the value 1 from every byte in the seed:
LIBOPENBLT_EXPORT uint32_t XCP_ComputeKeyFromSeed(uint8_t resource, uint8_t seedLen,
                                                  uint8_t const * seedPtr,
                                                  uint8_t * keyLenPtr,
                                                  uint8_t * keyPtr)
{
  uint32_t result = XCP_RESULT_ERROR;
  uint8_t idx;

  /* This example implementation of the key algorithm for PGM simply decrements the value
   * of each seed byte by 1. This coincides with the default implementation of the hook-
   * function XcpVerifyKeyHook() in the OpenBLT demo bootloaders.
   */
  if (resource == XCP_RESOURCE_PGM)
  {
    /* Compute the key. */
    for (idx = 0; idx < seedLen; idx++)
    {
      keyPtr[idx] = seedPtr[idx] - 1;
    }
    /* Set the key length. */
    *keyLenPtr = seedLen;
    /* Update the result value. */
    result = XCP_RESULT_OK;
  }
  /* Give the result back to the caller. */
  return result;
}
Customize the key generation algorithm to match the one you implemented in XcpVerifyKeyHook(). Once done, rebuild the XCP Seed and Key shared library. Instructions for building the shared library are located towards the bottom of this page. Under Windows the output is “libseednkey.dll”, and under Linux it is “libseednkey.so”.
SeedNKey relies on CMake to automatically detect the build tools on your system and to generate the build environment for it. The following instructions assume that CMake is installed on your system and is available on the path. Windows users can download the installer from http://www.cmake.org/. Mainstream Linux distributions have CMake in their software repository and it can be installed from there. Example for Ubuntu based distributions:
sudo apt-get install cmake
This method assumes that the basic tools needed for building software are installed. At least the GCC compiler and Make are needed. On Ubuntu based distributions, the tools can be installed via command:
sudo apt-get install build-essential
Using the terminal, set the working directory to ./Host/Source/SeedNKey/build. Next, type the following two commands to detect and generate the Unix Makefiles based build environment and then build the shared SeedNKey library:
cmake ..
make

After a successful build, the shared library libseednkey.so is located in the ./Host directory.
This method assumes that Microsoft Visual C++ is installed. During the SeedNKey development, Microsoft Visual Studio 2019 was used. The method outlined here should work just fine with both older and newer versions of Microsoft Visual Studio.
Using the Command Prompt in Windows, set the working directory to .\Host\Source\SeedNKey\build and type the command:
cmake ..
A solution file for Microsoft Visual C++ is then automatically generated, called seednkey.sln. Open the solution in Microsoft Visual C++ and build the program from there, by selecting Build→Rebuild Solution from the menu.
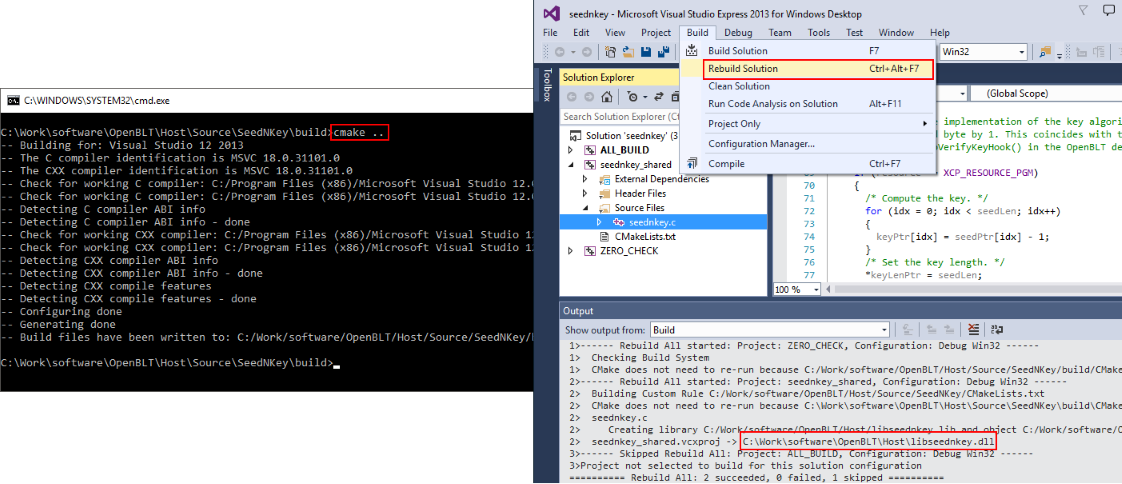
After a successful build, the shared library libseednkey.dll is located in the ./Host directory.
Note that this builds a 64-bit version of libseednkey.dll, which only works together with 64-bit versions of the PC binaries (MicroBoot, BootCommander and LibOpenBLT). This is the default starting with OpenBLT version 1.14.
When using the PC binaries from before OpenBLT version 1.14, or if you rebuilt them yourself as 32-bit, then you should build libseednkey.dll as 32-bit as well. To build a 32-bit version of libseednkey.dll, generate the build environment with command “cmake -A Win32..”.
This method assumes that the MinGW compiler toolchain is installed on your PC. A convenient way to install it, is by downloading the installer that bundles the Code::Blocks IDE together with MinGW. When using OpenBLT version 1.14 or newer, it is recommended to download the 64-bit installer version, because the included PC binaries (MicroBoot, BootCommander and LibOpenBLT) are 64-bit as well. Otherwise you can download the 32-bit installer version.
Make sure the .\bin directory of the MinGW installation directory is added to your path in Windows. A quick way to verify that this is the case, run the following command from the Command Prompt in Windows and make sure the program could be found:
mingw32-make
Using the Command Prompt in Windows, set the working directory to .\Host\Source\SeedNKey\build. Next, type the following two commands to detect and generate the MinGW Makefiles based build environment and then build shared SeedNKey library:
cmake -G "CodeBlocks - MinGW Makefiles" ..
mingw32-make
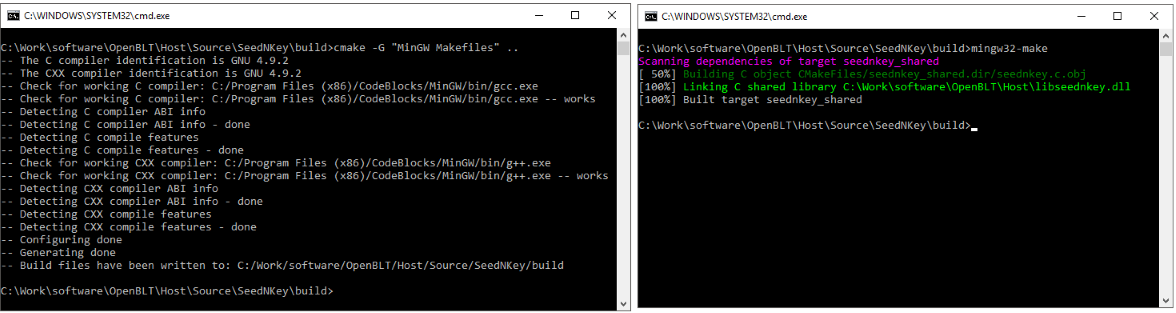
After a successful build, the shared library libseednkey.dll is located in the .\Host directory.
