A future release of the OpenBLT bootloader will feature full support of the relatively new STM32CubeIDE. For those that would like to use STM32CubeIDE sooner, there is the TrueSTUDIO project import feature. So you can take the already existing OpenBLT demo programs for TrueSTUDIO and import them in STM32CubeIDE. The goal of this article is to show you step-by-step how to import OpenBLT demo programs, which are configured for TrueSTUDIO, into STM32CubeIDE.
Background
The relatively new STM32CubeIDE was release about a year ago by ST. It is a full featured and Eclipse based integrated development environment. It even integrates the CubeMX tool for configuring your STM32 microcontroller and automatically generating code accordingly. The ultimate tool for rapid application development for your STM32 project. It not only runs under Windows but also under MacOS and Linux. As a big Linux fan myself, I am personally very excited about this multiplatform support.
To me it seems that STM32CubeIDE will replace Atollic TrueSTUDIO in the near future. For this reason I intend to add STM32CubeIDE support to all OpenBLT demo programs that target an STM32 microcontroller. If all goes according to plan, full STM32CubeIDE support will be available in the next OpenBLT release, which has a target date of early January 2021. For those that would like to use STM32CubeIDE sooner, there is the TrueSTUDIO project import feature. So you can take the already existing OpenBLT demo programs for TrueSTUDIO and import them in STM32CubeIDE.
After experimenting with STM32CubeIDE’s import feature for TrueSTUDIO projects, I can confirm that it definitely works. However, you still need to make a few minor project changes yourself after the import operation. Therefore the goal of this article is to show you step-by-step how to import OpenBLT demo programs, which are configured for TrueSTUDIO, into STM32CubeIDE. I will take the demo programs for the Nucleo-F767ZI board as an example in this article.
As a starting point, download the latest stable release of the OpenBLT bootloader. At the time of this writing, the latest stable release is version 1.10.0. Once downloaded, extract the zip-archive. In my case the extracted files are located at C:\Work\software\OpenBLT.
Importing the TrueSTUDIO projects
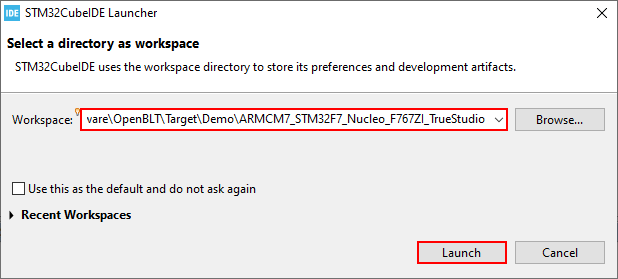
The TrueSTUDIO demo programs for the Nucleo-F767ZI board reside in subdirectory: .\Target\Demo\ARMCM7_STM32F7_Nucleo_F767ZI_TrueStudio. Start STM32CubeIDE and create a new workspace in this directory:
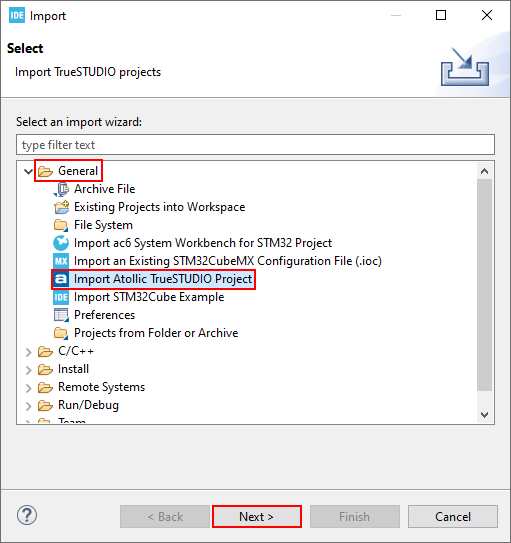
Once the STM32CubeIDE started up and opened the newly created workspace, select File → Import from the program menu. After the import dialog that appeared, select General → Import Atollic TrueSTUDIO Project:
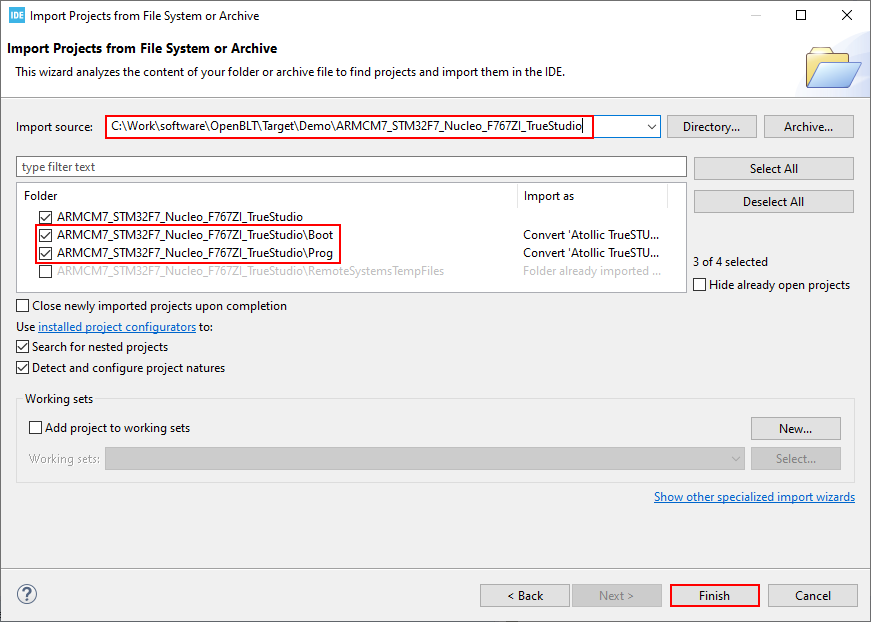
In the first edit box, called Import source, enter the directory of the demo programs, so .\Target\Demo\ARMCM7_STM32F7_Nucleo_F767ZI_TrueStudio. The import wizard automatically detects and selects the Boot and Prog projects. These are the projects for the demo bootloader and demo user program, respectively. Click Finish to start the import process. The import wizard prompts you to confirm the project conversion. Click OK on these dialogs.
Cleanup the imported projects
After importing the projects, a few minor project changes still need to be made, before they can be compiled and linked. These changes are the same for boot the Boot and the Prog project, so only the Boot project will be described here.
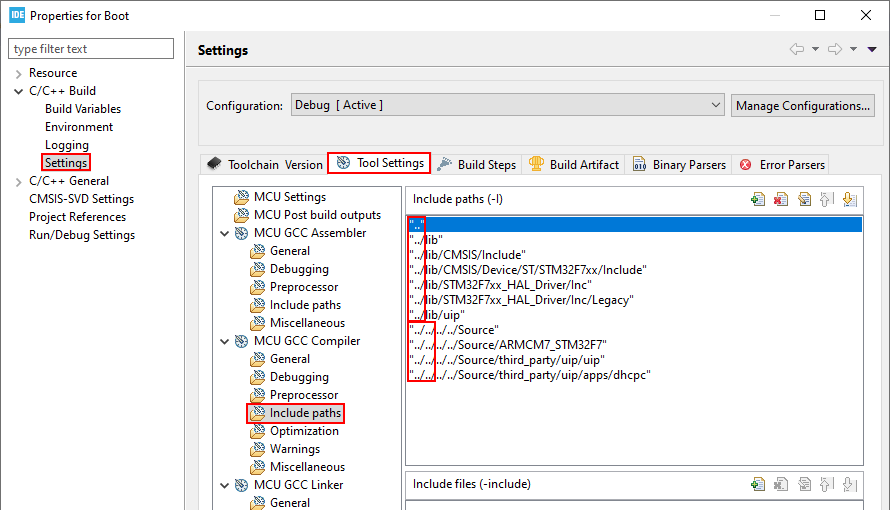
- Right-click the Boot project in the Project Explorer and select Properties from the popup menu. Adjust the compiler include paths, because the default working directory seems to be different:
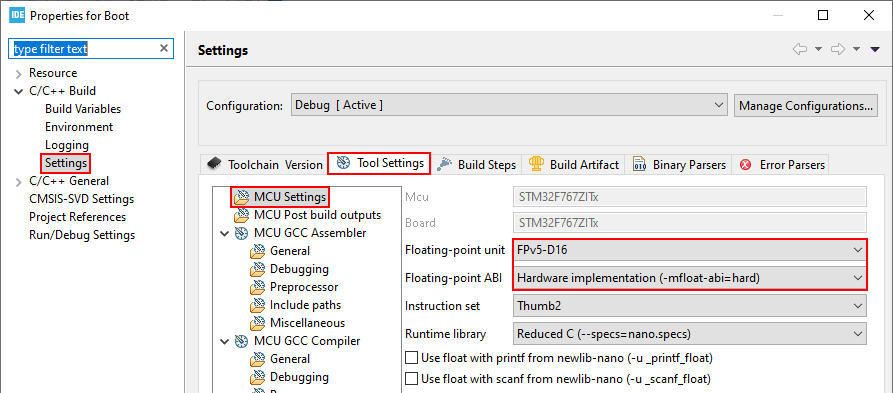
- On the same project properties dialog, configure the floating point unit. This might not be necessary for STM32 families that do not feature a hardware floating point.
- As a final step, delete the openblt_stm32f767.elf file to force a proper rebuild. The file resides in directory
.\Target\Demo\ARMCM7_STM32F7_Nucleo_F767ZI_TrueStudio\Boot\Debug.
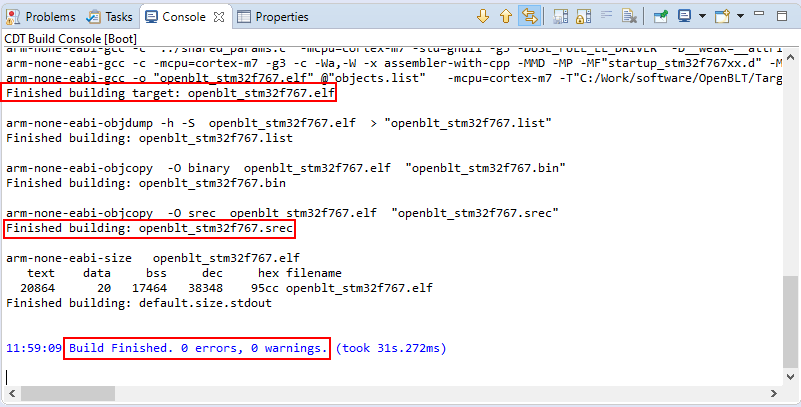
At this point you completed all the necessary fixes to the imported project. As a next step you can attempt to build the project. Right-click the Boot project in the Project Explorer and select Build Project from the popup menu. You can follow the progress in the Console window. If all went okay, it should look something like this:
Note that you still need to repeat the same steps for the demo user program project (Prog).
Wrap up
You now successfully imported the TrueSTUDIO demo programs for the Nucleo-F767ZI board into STM32CubeIDE. Next, you can use the STM32CubeIDE integrated debugger to program and start running the bootloader on this board. Once the bootloader runs on the board, you can start the MicroBoot or BootCommander PC tool to perform firmware updates with the bootloader. For example by means of RS232. I hope you enjoyed reading this article and that it all worked out for you.