Did you know that the OpenBLT bootloader includes a shared library, allowing you to quickly develop your own firmware update tool? This library is called LibOpenBLT. Recently, I developed LibOpenBLT bindings for the C# programming language. It’s basically a wrapper class for easily accessing the functionality inside LibOpenBLT. This article explains how to get started with the C# bindings for LibOpenBLT. Together we’ll build a firmware update tool in the C# programming language.
Background
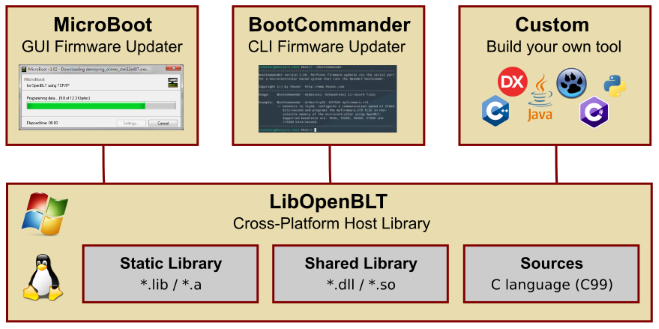
When you just get started with the OpenBLT bootloader, you probably performed a firmware update using either the MicroBoot or the BootCommander PC tool. MicroBoot offers a graphical user interface as opposed to BootCommander, which you run as a command-line program in the terminal. Did you know that there is a third option? The OpenBLT bootloader package includes the OpenBLT Host Library, called LibOpenBLT. With LibOpenBLT you can quickly and easily create your own firmware update tool.
LibOpenBLT is a shared library. So a DLL-file under Microsoft Windows and a SO-file under GNU/Linux. LibOpenBLT contains all the functionality for parsing firmware files and for communicating with a microcontroller running the OpenBLT bootloader. It is what both MicroBoot and BootCommander use under the hood too:
LibOpenBLT is written in the C programming language. As such, it is quite easy to add the sources to your own application, when building your own firmware update tool in C and C++. For other programming languages, it gets a bit trickier. You need to first figure out how to load and access the functions inside the LibOpenBLT shared library at run-time. To make this task easier, I already created so called bindings for the Python and Object Pascal programming languages. With the help of these bindings, you can easily access the functions inside the LibOpenBLT shared library. So without needing any special knowledge about shared library.
Over the years I received more and more requests for being able to use LibOpenBLT in C# applications. For this reason, I developed C# bindings for LibOpenBLT recently. This article helps you get started with these C# bindings for LibOpenBLT. After going through this article you know enough to develop your own firmware update tool in C# with LibOpenBLT.
What do you need
In this article, we’ll create a basic firmware update tool as a C# console application. It serves as a demonstration for the C# bindings. You can also use it as a foundation for your own firmware update tool.
In this article I’ll use Microsoft Visual Studio 2019 as the IDE. If you use the same, then success is pretty much guaranteed. However, it should work just fine with different C# development tools. For example, I also tested the C# bindings under GNU/Linux, where I used Visual Studio Code with the C# extension.
Then you need a version of OpenBLT that includes these C# bindings. It will be available starting with OpenBLT version 1.12. At the time of this writing, OpenBLT version 1.12 is planned for release in begin July 2021. If you read this article before the release of OpenBLT version 1.12, you can get the C# bindings from either the SVN trunk on SourceForge or from the GIT master branch on GitHub.
For testing out the firmware update tool, you need a microcontroller running the OpenBLT bootloader. One that is configured for firmware updates via RS232. I decided on using the Nucleo-F746ZG demo programs, included with OpenBLT.
Create a new C# console application in Visual Studio
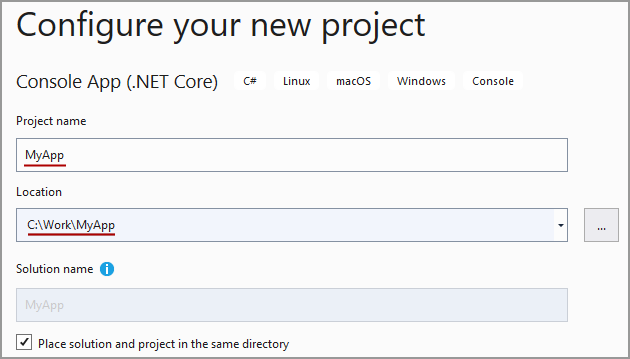
Launch Visual Studio and select Create a new project. Next, select Console App (.NET Core) as the project template:

On the next dialog, enter a project name and location. I decided on naming the project MyApp and storing it in directory C:\Work\MyApp. Feel free to change this to your own liking.
Once the project is created, you can see your typical Hello World console program in source file Program.cs.
Configure the platform target
Under Microsoft Windows, the LibOpenBLT shared library (libopenblt.dll) is 64-bit ever since OpenBLT version 1.14. For this reason you need to build your own C# program as a 64-bit application as well. Otherwise it won’t be able to properly access the LibOpenBLT shared library.
To configure our C# console application to build as a 64-bit application, right-click My App in the Solution Explorer. From the pop-up menu, select Properties. On the properties screen, go to the Build section and set Platform target to x64:
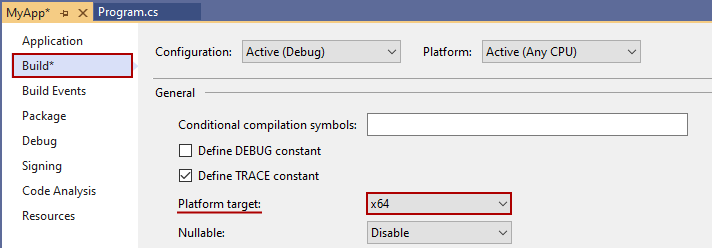
If you use the LibOpenBLT shared library from before OpenBLT version 1.14 or if you rebuilt it yourself as 32-bit, then you need to set the Platform target to x86 instead.
After configuring the platform target, you can do a trial build, just to make sure everything works so far. Select Build → Build Solution from the program menu, or just press F7.
Copy the run-time libraries
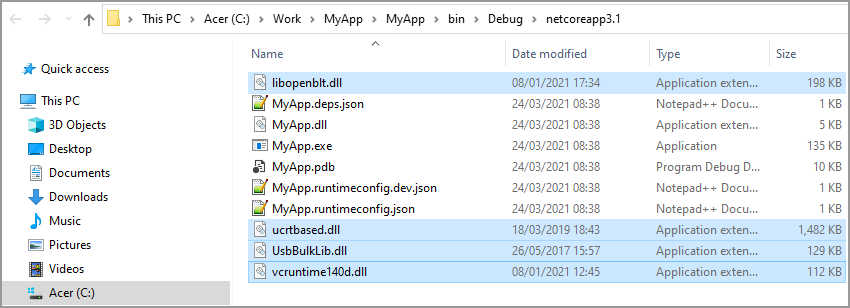
With the console application set up, we continue with copying the LibOpenBLT related run-time libraries to the directory that holds the executable MyApp.exe of the console application. In my case, this directory is C:\Work\MyApp\MyApp\bin\Debug\netcoreapp3.1.
For an overview of the run-time libraries, visit this page on the OpenBLT Wiki. You can find these files in the .\Host\ directory of the OpenBLT package. Copy the run-time libraries to the same directory where your MyApp.exe is located:
Integrate the LibOpenBLT C# bindings
With the actual LibOpenBLT shared library file in place, including its dependencies, it’s time to add the actual C# bindings to our project. You can find the LibOpenBLT C# bindings in source file openblt.cs. This file is located in directory .\Host\Source\LibOpenBLT\bindings\csharp\ of the OpenBLT package. Alternatively, you can grab the file directly from the SVN or GitHub repository. Copy the openblt.cs file to the same directory in your project as where the Program.cs file resides.
Test access to the LibOpenBLT library
The LibOpenBLT C# bindings are now properly integrated. Before diving straight into building our own firmware update tool, let’s first verify that we can access the LibOpenBLT library.
In our console application’s main() function, you can see a line that writes Hello World to the console:
Console.WriteLine("Hello World!");
Replace this with the following line that obtains the LibOpenBLT version number:
Console.WriteLine("LibOpenBLT version number: {0}", OpenBLT.Lib.Version.GetNumber());
Now run the program, by selecting Debug → Start Without Debugging from the program menu. Alternatively, you can press CTRL + F5 on the keyboard. If everything is alright, then a console window opens and prints out the LibOpenBLT version number. In my case it is version 1.3.5:

Develop the firmware update tool in C#
After verifying the proper integration of the LibOpenBLT C# bindings, we can continue with building a basic firmware update tool. As mentioned at the beginning of this article, I’ll use the OpenBLT demo programs for the Nucleo-F746ZG board. We’ll develop a console program for updating the firmware on this microcontroller via RS232.
After connecting the Nucleo-F746ZG board to my PC with a USB cable, it pops up as COM10 in the Windows Device Manager. So this will be the communication port to use for the firmware update. The firmware file of the demo user program is demoprog_stm32f746.srec. You can find it in the OpenBLT package in directory \Target\Demo\ARMCM7_STM32F7_Nucleo_F746ZG_CubeIDE\Prog\Debug. For simplicity purposes, I copied this file to the same directory as where the MyApp.exe program resides. This directory is part of the default search path of the application on Windows, meaning that we do not need to specify the entire directory, when accessing the firmware file.
Load firmware data from the S-record
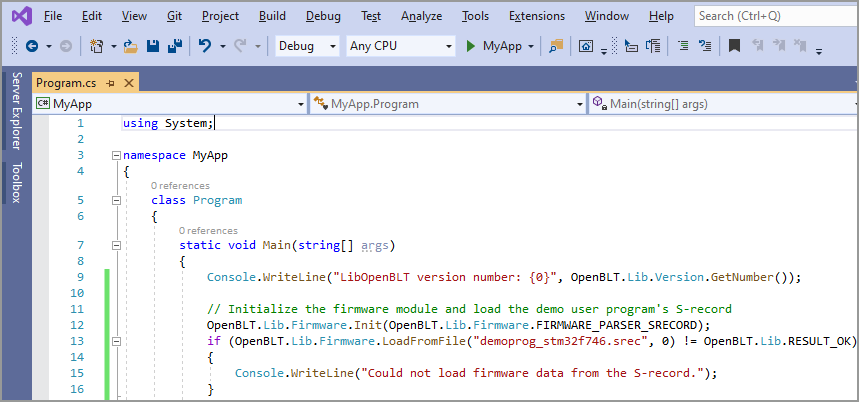
As a first step during the firmware update, we initialize LibOpenBLT’s firmware module. Once initialized, we can load the firmware data of the demo user program’s S-record. Add the following code below the line that prints out the LibOpenBLT version number:
// Initialize the firmware module and load the S-record
OpenBLT.Lib.Firmware.Init(OpenBLT.Lib.Firmware.FIRMWARE_PARSER_SRECORD);
if (OpenBLT.Lib.Firmware.LoadFromFile("demoprog_stm32f746.srec", 0) != OpenBLT.Lib.RESULT_OK)
{
    Console.WriteLine("Could not load firmware data from the S-record.");
}
Connect to the OpenBLT bootloader on the microcontroller
With the firmware data loaded, we continue with initializing the LibOpenBLT session module for firmware updates via RS232. Afterwards we can establish a connection with the OpenBLT bootloader on the microcontroller. Add the next code snippet for this:
// Initialize the session module
OpenBLT.Lib.Session.SessionSettingsXcpV10 sessionSettings;
sessionSettings.timeoutT1 = 1000;
sessionSettings.timeoutT3 = 2000;
sessionSettings.timeoutT4 = 10000;
sessionSettings.timeoutT5 = 1000;
sessionSettings.timeoutT6 = 50;
sessionSettings.timeoutT7 = 2000;
sessionSettings.seedKeyFile = "";
sessionSettings.connectMode = 0;
OpenBLT.Lib.Session.TransportSettingsXcpV10Rs232 transportSettingsRs232;
transportSettingsRs232.portName = "COM10";
transportSettingsRs232.baudrate = 57600;
OpenBLT.Lib.Session.Init(sessionSettings, transportSettingsRs232);

// Connect to the bootloader on the microcontroller
while (OpenBLT.Lib.Session.Start() != OpenBLT.Lib.RESULT_OK)
{
    OpenBLT.Lib.Util.Time.DelayMs(20);
}
Note that I added a connection retry mechanism. Sometimes the bootloader is not yet active on the microcontroller. The loop automatically retries the connection with a short delay in between to not hog up the CPU too much. If you can’t establish a connection, you can try resetting the microcontroller and also double-check that you specified the correct COM port and baudrate.
Erase flash memory
We now established an active connection with the OpenBLT bootloader on the target. Before we can program the firmware, which we loaded from the firmware file, we need to first erase the flash memory that we intend to reprogram. Add the following code to erase all the memory segments that were found in the S-record:
// Erase flash memory
for (UInt32 segmentIdx = 0; segmentIdx < OpenBLT.Lib.Firmware.GetSegmentCount(); segmentIdx++)
{
    var segment = OpenBLT.Lib.Firmware.GetSegment(segmentIdx);
    if (OpenBLT.Lib.Session.ClearMemory(segment.address, segment.data.Length) != OpenBLT.Lib.RESULT_OK)
    {
        Console.WriteLine("Could not erase memory.");
    }
}
Program flash memory
With the flash memory erased, we can continue with programming the new firmware data into flash memory. The following code snippet achieves this step:
// Program flash memory
for (UInt32 segmentIdx = 0; segmentIdx < OpenBLT.Lib.Firmware.GetSegmentCount(); segmentIdx++)
{
    var segment = OpenBLT.Lib.Firmware.GetSegment(segmentIdx);
    if (OpenBLT.Lib.Session.WriteData(segment.address, segment.data) != OpenBLT.Lib.RESULT_OK)
    {
        Console.WriteLine("Could not program memory.");
    }
}
Disconnect from the OpenBLT bootloader on the microcontroller
After programming the new firmware data into flash memory, it is time to stop the programming session and disconnect the bootloader. This automatically writes the 32-bit signature checksum value into flash memory and starts the newly programmed firmware:
// Disconnect and start new firmware
OpenBLT.Lib.Session.Stop();
After each reset event, the bootloader always runs first for a short amount of time to detect a new firmware update request. If none detected, it verifies the 32-bit signature checksum to determine if firmware is present. If so, the bootloader starts the firmware. Note that this default signature checksum verification only covers a small part of the firmware. Just enough to decided if firmware is present or not. If you prefer a full firmware checksum verification, have a look at the Improved Checksum add-on module for the OpenBLT bootloader.
Terminate the program
Before we can close our console application, we should properly terminate LibOpenBLT’s firmware and session modules. This releases dynamically allocated memory:
// Termination
OpenBLT.Lib.Firmware.Terminate();
OpenBLT.Lib.Session.Terminate();
Overview of the completed example console application
This already completes our C# firmware update tool. Pretty straightforward, right? Assuming that you already programmed the OpenBLT demo bootloader on the Nucleo-F746ZG board, you can run the MyApp.exe program to perform a firmware update via RS232 using the demoprog_stm32f746.srec demo user program firmware file.
Here is the entire C# console application for reference purposes:
using System;

namespace MyApp
{
    class Program
    {
        static void Main(string[] args)
        {
            Console.WriteLine("LibOpenBLT version number: {0}", OpenBLT.Lib.Version.GetNumber());

            // Initialize the firmware module and load the S-record
            OpenBLT.Lib.Firmware.Init(OpenBLT.Lib.Firmware.FIRMWARE_PARSER_SRECORD);
            if (OpenBLT.Lib.Firmware.LoadFromFile("demoprog_stm32f746.srec", 0) != OpenBLT.Lib.RESULT_OK)
            {
                Console.WriteLine("Could not load firmware data from the S-record.");
            }

            // Initialize the session module
            OpenBLT.Lib.Session.SessionSettingsXcpV10 sessionSettings;
            sessionSettings.timeoutT1 = 1000;
            sessionSettings.timeoutT3 = 2000;
            sessionSettings.timeoutT4 = 10000;
            sessionSettings.timeoutT5 = 1000;
            sessionSettings.timeoutT6 = 50;
            sessionSettings.timeoutT7 = 2000;
            sessionSettings.seedKeyFile = "";
            sessionSettings.connectMode = 0;
            OpenBLT.Lib.Session.TransportSettingsXcpV10Rs232 transportSettingsRs232;
            transportSettingsRs232.portName = "COM10";
            transportSettingsRs232.baudrate = 57600;
            OpenBLT.Lib.Session.Init(sessionSettings, transportSettingsRs232);

            // Connect to the bootloader on the microcontroller
            while (OpenBLT.Lib.Session.Start() != OpenBLT.Lib.RESULT_OK)
            {
                OpenBLT.Lib.Util.Time.DelayMs(20);
            }

            // Erase flash memory
            for (UInt32 segmentIdx = 0; segmentIdx < OpenBLT.Lib.Firmware.GetSegmentCount(); segmentIdx++)
            {
                var segment = OpenBLT.Lib.Firmware.GetSegment(segmentIdx);
                if (OpenBLT.Lib.Session.ClearMemory(segment.address, segment.data.Length) != OpenBLT.Lib.RESULT_OK)
                {
                    Console.WriteLine("Could not erase memory.");
                }
            }

            // Program flash memory
            for (UInt32 segmentIdx = 0; segmentIdx < OpenBLT.Lib.Firmware.GetSegmentCount(); segmentIdx++)
            {
                var segment = OpenBLT.Lib.Firmware.GetSegment(segmentIdx);
                if (OpenBLT.Lib.Session.WriteData(segment.address, segment.data) != OpenBLT.Lib.RESULT_OK)
                {
                    Console.WriteLine("Could not program memory.");
                }
            }

            // Disconnect and start new firmware
            OpenBLT.Lib.Session.Stop();

            // Termination
            OpenBLT.Lib.Firmware.Terminate();
            OpenBLT.Lib.Session.Terminate();
        }
    }
}
Wrap up
This article explained step-by-step how to develop your own firmware update tool in C#, using the LibOpenBLT C# bindings. We created a new C# console application project in Visual Studio, integrated the LibOpenBLT C# bindings and implemented a minimalistic firmware update tool.
You can use this firmware update tool as a reference and starting point for developing a more elaborate firmware update tool. For example one that allows you to specify the COM port and firmware file as command-line parameters. You could also improve it to support different communication media for the firmware update, such as USB, CAN and TCP/IP.
As a final tip: Have a look at the source code comments inside the openblt.cs file. It contains code examples for each function, inside the wrapper class of the LibOpenBLT C# bindings.